Making wine from fruit — peaches, blackberries, elderberries, plums, whatever’s growing in your backyard or piling up at the farmers market — is one of those projects that looks intimidating until you understand what’s actually happening. At its core, winemaking is fermentation: you’re giving wild or cultivated yeast a sugar-rich liquid (called the “must”), controlling the environment, and letting those organisms convert sugar into alcohol and carbon dioxide over days to weeks. The equipment you need to do this safely for one gallon is modest. The challenge for a first-timer isn’t the process — it’s buying a starter kit and discovering it’s missing the two or three pieces that actually matter. This guide breaks down what a complete one-gallon fruit wine setup looks like, where the budget kits cut corners, and how to read a spec list so you know what you’re getting before you click “add to cart.”
What a One-Gallon Kit Actually Needs to Contain
Most starter kits are built around a one-gallon glass jug — called a carboy (a narrow-necked vessel used for secondary fermentation, where wine finishes and clarifies after the initial vigorous bubbling subsides) — plus an airlock (a small water-filled valve that lets CO₂ escape while keeping oxygen and wild bacteria out) and a bung (the rubber or silicone stopper that seats the airlock in the carboy neck). Those three items are the non-negotiables; without them you cannot ferment anything safely.
But a complete kit for fruit wine needs more than just fermentation hardware. Here’s the decision framework: think in three phases.
Phase 1 — Preparation. You need to sanitize everything that touches the must. That means a no-rinse sanitizer (potassium metabisulfite powder, sold as “Campden tablets,” or a commercial product like Star San) and something to crush or mash soft fruit. A basic potato masher works for small batches, but reviewers in long-run discussions of beginner fruit wine consistently flag a missing mesh straining bag — called a fruit bag or nylon straining bag — as the single biggest gap in cheap starter kits. Without it, you’re pressing pulp through a sieve by hand, and free-run fruit solids will clog your siphon.
Phase 2 — Fermentation. Beyond the carboy, airlock, and bung, you need a hydrometer (an instrument that measures sugar concentration in the must, which lets you track fermentation progress and calculate final alcohol content — typically expressed as ABV, alcohol by volume) and a trial jar (a clear cylinder to float the hydrometer in without contaminating the batch). The hydrometer is not optional if you care about reproducibility. Penn State Extension’s Home Winemaking Guide is direct on this point: without gravity readings at the start and finish of fermentation, you’re guessing at both sugar additions and final alcohol, which means you can’t diagnose a stuck fermentation (one that stops before all sugar is consumed) or replicate a batch that came out well.
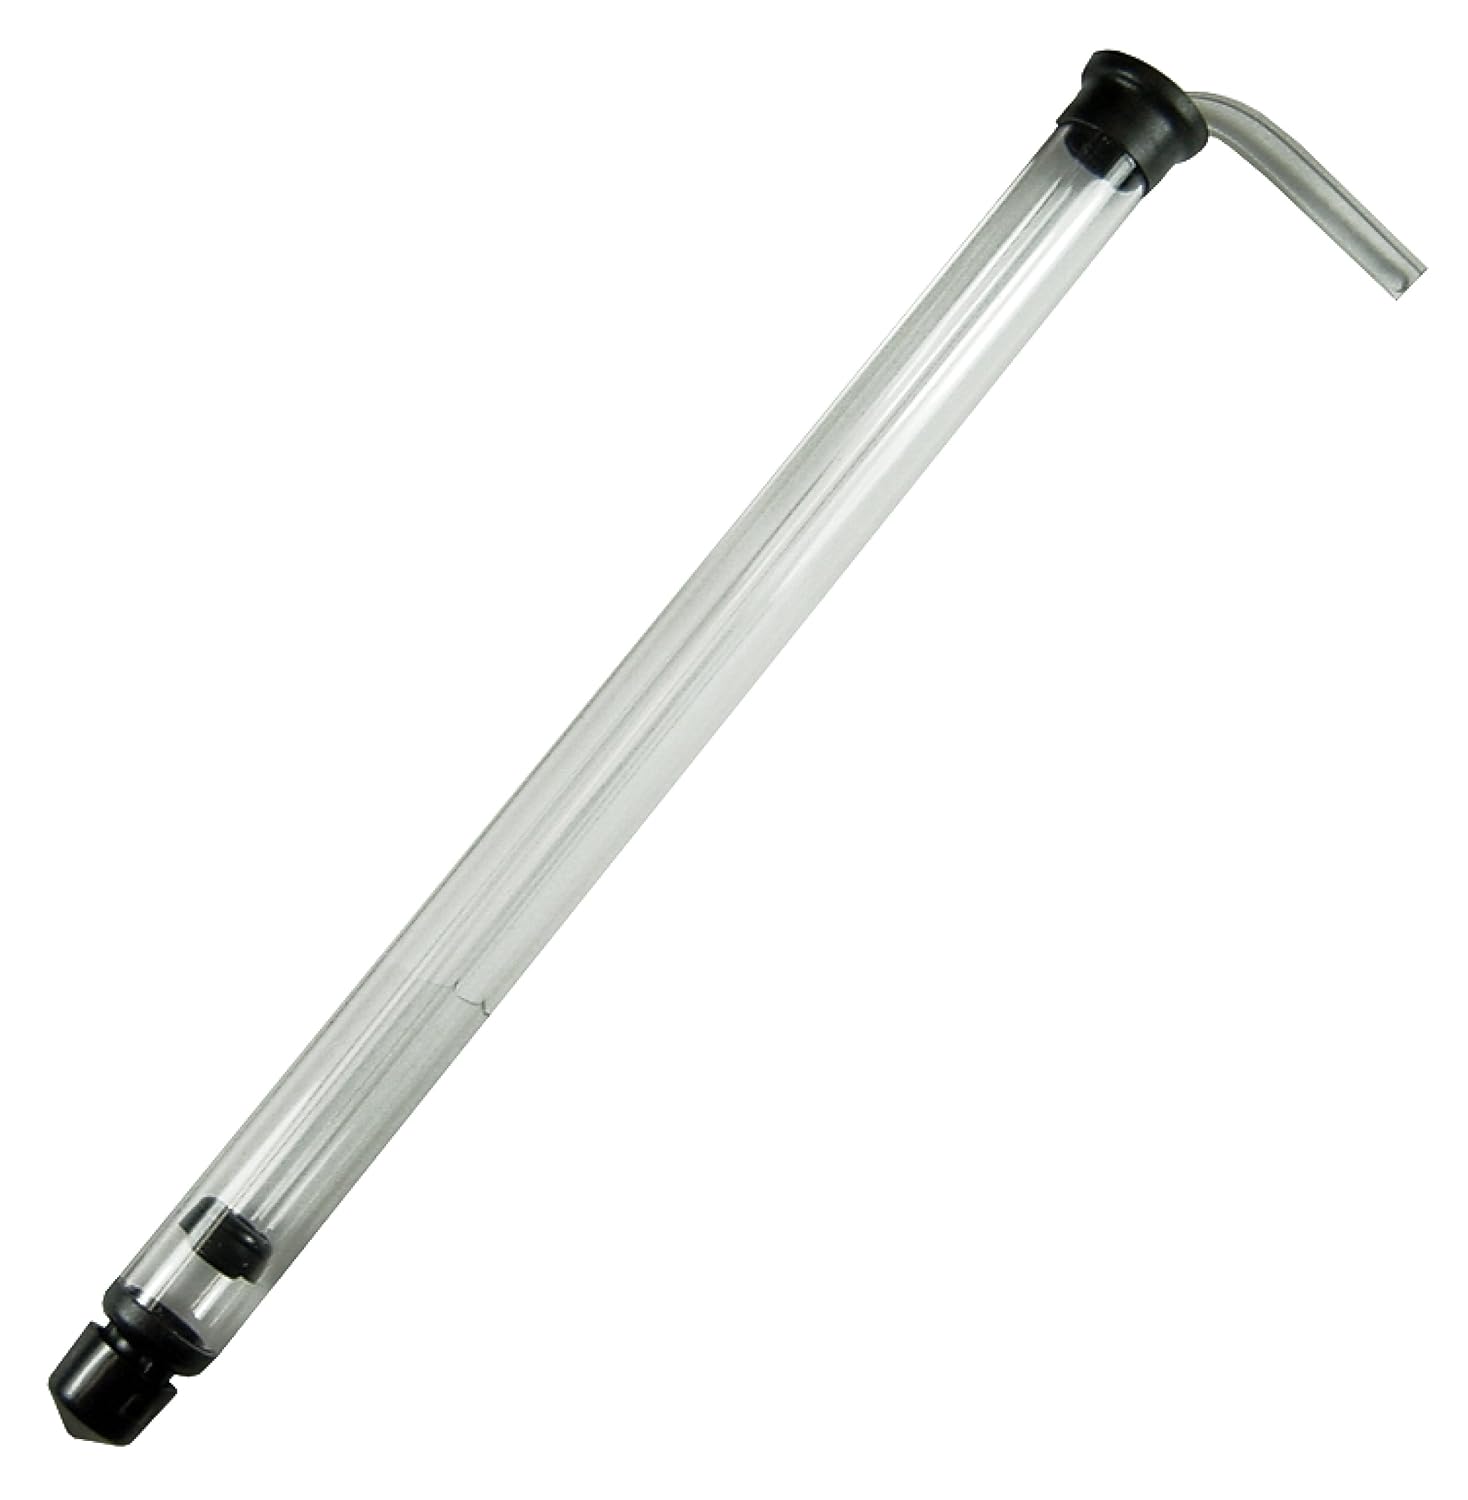
Phase 3 — Transfer and finishing. You’ll need a siphon assembly — an auto-siphon (a racking cane with a pump mechanism that starts the flow without you putting your mouth on the tube) plus food-grade vinyl tubing — to move wine off the sediment (called the “lees”) without disturbing it. Bottle-filling wands and a hand corker round out the setup. Many kits stop at the siphon and leave you shopping for a corker and corks separately.
Where Budget Kits Cut Corners (and How to Spot It)
Retail price alone doesn’t tell you much. The $35–$50 kits that show up on general marketplaces typically include the carboy, airlock, bung, and a length of tubing. They frequently omit:
- A hydrometer and trial jar
- A straining bag
- Potassium metabisulfite or another sanitizer
- An auto-siphon (replaced with manual siphon tubing, which requires mouth-starting)
- Any yeast — even a single packet of a neutral wine yeast
The $60–$80 kits from dedicated homebrew and winemaking suppliers tend to close most of those gaps. The difference is whether the seller understands that winemaking has chemistry requirements, not just hardware requirements.
The yeast question deserves its own paragraph. For fruit wine, yeast strain matters more than most beginners expect. MoreWine!‘s fruit wine resources consistently recommend strains rated for high acid environments and moderate residual aromatics — Lalvin 71B is frequently cited for berry and stone-fruit wines because it metabolizes a portion of malic acid (a sharp, green-apple acid common in underripe fruit) through a process called partial malo-lactic conversion, softening the final wine without a separate fermentation step. Red Star Côte des Blancs is another common recommendation for peach and apricot, where preserving delicate aromatics is the goal. A starter kit that includes a generic “wine yeast” packet without identifying the strain leaves you unable to look up its temperature range, alcohol tolerance, or flavor profile — all of which affect whether your batch finishes dry, semi-sweet, or stuck.
BSG Handcraft’s winemaking ingredient catalog notes that most home winemaking yeast strains have an alcohol tolerance between 12–15% ABV and prefer fermentation temperatures between 60–75°F (15–24°C). A kit that doesn’t tell you which strain it includes can’t tell you those parameters either.
By the Numbers: One-Gallon Fruit Wine Starter Budget
| Component | Budget Tier | Mid Tier |
|---|---|---|
| Glass carboy (1 gal) + bung + airlock | $8–$12 | $10–$15 (thicker glass, molded bung seat) |
| Hydrometer + trial jar | often missing | $8–$12 |
| Auto-siphon + tubing | often missing | $10–$14 |
| Straining bag | often missing | $3–$5 |
| Sanitizer (K-meta or similar) | sometimes included | $4–$7 |
| Identified yeast strain (Lalvin / Red Star) | rarely included | $1–$3 per packet |
| Total kit cost | $35–$50 (gaps remain) | $55–$80 (complete) |
The math here is straightforward: a $45 kit that’s missing a hydrometer, auto-siphon, and straining bag will cost $65–$75 once you buy the missing pieces. A $70 kit from a dedicated winemaking supplier that includes all of the above is the better value — and you won’t be mid-fermentation, driving to a homebrew shop for a siphon.
The Decision Frame: Which Kit for Your Situation
This is where the “if X, then Y” logic matters more than a single ranked list.
If you’re making one batch to see if you enjoy the process — and your fruit is soft (blackberries, raspberries, strawberries) — the minimum viable kit is: one-gallon glass carboy, drilled rubber bung, three-piece airlock, hydrometer, trial jar, one nylon straining bag, and a packet of Lalvin EC-1118 or 71B. EC-1118 is a robust champagne-style yeast with a high alcohol tolerance and aggressive fermentation that will finish almost any fruit must; 71B is better if you want a softer, fruitier result. UC Davis’s Introduction to Home Winemaking notes that EC-1118 is a reliable workhorse for beginners precisely because it rarely stalls, even when must chemistry isn’t dialed in. Add a 50-count bag of Campden tablets (potassium metabisulfite) for sanitizing, and you have everything you need for under $50 if you source thoughtfully.
If you’re planning two or three batches this season — different fruits, different yeast trials — invest in the mid-tier kit and add a pH meter or pH strips to the order. WineMaker Magazine’s fruit wine guidance consistently emphasizes that fruit wines are more acidic than grape wines, and that acid corrections (using tartaric or citric acid to raise pH, or potassium bicarbonate to lower acidity) make an enormous difference in finished flavor balance. You don’t need a $150 lab-grade pH meter at this stage; a $20–$35 digital pocket meter rated to ±0.1 accuracy is sufficient, and owners of the common ATC (automatic temperature-compensating) models report consistent readings across dozens of batches.
If you’re treating this as a gateway to a larger setup — you already know you’ll scale to five or six gallons within a year — don’t over-invest in one-gallon glass. A better allocation is: buy the minimum one-gallon kit now for testing recipes and yeast strains, and put the upgrade budget toward a six-gallon Better Bottle or glass carboy, a quality floor corker, and a bench-top wine filter when you’re ready to scale. The one-gallon kit teaches you the process; the six-gallon setup is where the economics of fruit wine start making sense.
A Note on Fruit Prep: The Step Kits Don’t Cover
Every kit in this category sells you hardware. None of them walks you through fruit preparation, which is where most first batches go wrong before fermentation even starts.
The key steps, according to MoreWine!‘s fruit wine process documentation:
-
Sulfite the must before yeast addition. Crush your fruit, add water and sugar to reach your target starting gravity (typically 1.085–1.100 for a fruit wine targeting 11–13% ABV), then add one crushed Campden tablet per gallon. Wait 24 hours before pitching yeast. This kills off wild yeast and bacteria without sterilizing — your cultured yeast will take over cleanly.
-
Measure gravity before and after. Your starting gravity tells you how much sugar is present; your ending gravity (target: 0.998–1.002 for a dry fruit wine) tells you fermentation is complete. The difference between the two, run through the standard formula (starting gravity minus final gravity, divided by 7.36, multiplied by 1.05), gives you ABV within about 0.5%.
-
Rack off the lees at day 3–5, then again after two weeks. “Racking” means siphoning the clearing wine into a clean vessel, leaving the yeast sediment behind. Fruit wines left too long on heavy lees pick up off-flavors — a bitterness described in UC Davis enology materials as “autolysis,” caused by decomposing yeast cells.
None of this is complicated. But knowing it before you buy means you know why your kit needs an auto-siphon (not just tubing), why the hydrometer isn’t optional, and why that straining bag is the difference between a clean rack and a clogged mess at 11 PM.
The Bottom Line
A complete one-gallon fruit wine starter kit should include, at minimum: a glass carboy, drilled bung, airlock, hydrometer, trial jar, nylon straining bag, auto-siphon, food-grade tubing, potassium metabisulfite, and an identified yeast strain. If a kit priced under $50 includes all of those, it’s genuinely complete. If it doesn’t name the yeast strain or omit the hydrometer, assume you’re buying hardware and will spend another $20–$30 filling the gaps. The mid-tier kits from dedicated winemaking suppliers — typically $60–$80 — close those gaps and are the right call for anyone who’s serious enough to be reading a guide like this before buying. Start with Lalvin 71B for berry and stone-fruit wines, sulfite your must 24 hours before pitching, take gravity readings at the start and finish, and rack clean. The fruit does the rest.